- How to Fix Air Leaks Breasts – Step-by-Step Self-Repair Guide
Air leaks in TPE or S-TPE doll breasts—especially hollow or gel-filled types—are rare but can happen.
Here’s a simple self-repair guide to restore your doll at home.
Common Causes
- Minor cuts or punctures
- Long-term pressure on the chest
- Rare manufacturing sealing differences
Self-Repair Guide
- Attach the needle to a syringe and remove the cap.
- Expel air bubbles from the syringe.
- Insert the needle into the breast’s concave point.
- Slowly inject air until the breast regains shape.
- Remove the needle and gently massage the area.
Tip: A step-by-step video is available for safe and easy guidance.
Prevention Tips
Inspect breasts regularly for minor damage
Avoid heavy objects pressing on the chest
Handle your doll gently
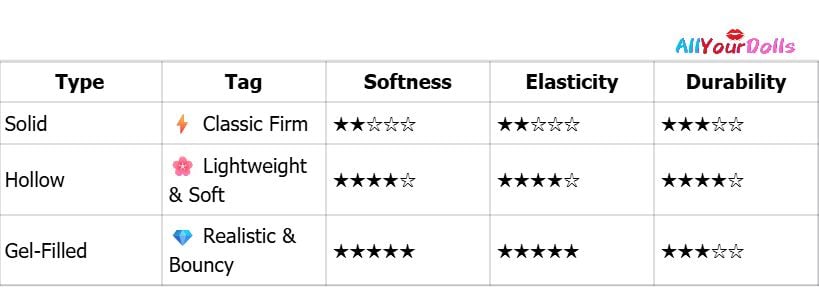
- What is Solid Breast?
A Solid breast is made from firm TPE or S-TPE material, offering a classic, durable feel that maintains its shape over time—ideal for users who prioritize stability over softness.
- Features: Original classic design made with solid TPE material.
- Advantages: Firm and durable, maintains shape well; small sizes (e.g., A cup) are common.
- Best for: Users who value long-term stability and durability, not concerned with softness.
- Notes: Less commonly used today; heaviest option; touch feels firm.
Below is a comparison of the softness levels of all three TPE & S-TPE doll breast types, helping you choose the one that best suits your preference.
📹 Watch the demonstration video below:
- What is Hollow Breast?
A Hollow breast is made from lightweight TPE or S-TPE material, providing a soft, natural feel with gentle bounce—ideal for users who value realistic softness and easier handling.
- Features: Hollow design filled with air, lightweight.
- Advantages: Soft to touch, full shape, doll is easier to hold and pose.
- Best for: Users who prefer a very soft feel and like to hug or pose the doll.
- Notes: Hollow breasts are relatively delicate; may sag when standing. A bra is recommended for support.
Below is a comparison of the softness levels of all three TPE & S-TPE doll breast types, helping you choose the one that best suits your preference.
For the most realistic feel, we recommend Gel Breasts for most customers, while Hollow is better suited for those opting for extra-large breasts.
📹 Watch the demonstration video below:
- What is Gel Breast?
A Gel-Filled breast is made from TPE or S-TPE with a soft gel interior, offering lifelike movement and realistic touch—perfect for users seeking maximum realism and natural feel.
- Features: Filled with soft gel, feels closest to real breasts.
- Advantages: Natural sag, noticeable jiggle, bouncy and realistic touch.
- Best for: Most default dolls; ideal for users seeking high realism.
- Notes: Slightly heavier than Hollow; extremely large or exaggerated sizes are not recommended.
Below is a comparison of the softness levels of all three TPE & S-TPE doll breast types, helping you choose the one that best suits your preference.
For the most realistic feel, we recommend Gel Breasts for most customers, while Hollow is better suited for those opting for extra-large breasts.
📹 Watch the demonstration video below:
- How to Clean Up Stains on Your Doll?
If your doll’s surface gets stained during use, follow these steps to clean it properly:
- Use Specialized Cleaning Oil Choose a cleaning oil that is specifically designed for silicone or TPE material. Avoid using alcohol, gasoline, or any harsh solvents, as they may damage the material.
- Gentle Wiping Pour a small amount of cleaning oil onto a soft sponge or cloth, then gently wipe the stained area.
- Important Notes
- Apply only to the stained area, avoid spreading over a large surface.
- After cleaning, use a clean towel to gently absorb any excess oil.
- Test on a small, inconspicuous spot first to ensure no discoloration.
- Let the doll air dry naturally in a cool, ventilated place after cleaning.
🎥 We’ve also prepared a demo video for you—please click below to watch the step-by-step cleaning process.
{"@context": "https://schema.org", "@type": "VideoObject", "name": "How to Clean Up Stains on Your Doll", "description": "How to Clean Up Stains on Your Doll", "thumbnailUrl": "https://cdn.dyntube.net/play/use-s/data/s8k0Un5KkCmQ7O4o6s0og/videos/2qR1VOIcUOZfen5vSvLkQ/v1/images/pubsrv/image_0fuLyq1l0SVlMYPxb1FgQ01-md.jpg", "uploadDate": "2025-09-29T09:03:21.9084731+00:00", "duration": "PT1M17.504S", "contentUrl": "https://video.allyourdolls.com/videos/LqcMkY93lkaaT9oH6mDSaQ", "embedUrl": "https://player.dyntube.com/iframes/GmbpwGivGUClqqPwwPKW4A"} - how to install removable vagina?
Before installing the removable vagina, please follow these steps to ensure safety, hygiene, and the best user experience:
- Cleaning
- Thoroughly clean the removable vagina before installation using a dedicated cleaning solution or lukewarm water. Ensure there is no dust or debris.
- After cleaning, let it air dry naturally or gently pat dry with a clean towel.
- Lubrication Preparation
- Before installation, apply a sufficient amount of water-based lubricant to both your hands and the inside/outside of the removable vagina to ensure smooth insertion and reduce friction.
- Reapply lubricant during use or before removal to protect silicone or TPE material.
- Installation
- Align the removable vagina with the doll’s pelvic opening and gently insert it, ensuring it fits securely and is fully seated.
- Avoid forcing it in or twisting excessively, as this may damage the interface or the material.
- Removal Precautions
- Before removing, apply lubricant and gently pull the removable vagina out. Avoid using excessive force to prevent tearing or stretching.
- Regular removal and cleaning can prevent odor and bacterial buildup.
- Storage Recommendations
- Keep the vagina dry after removal, store it in a clean, cool place, and avoid direct sunlight or high temperatures.
- Using a storage bag is recommended to prevent dust and deformation.
- Reference Demo
- This article references Funwest’s instructional video, which can be viewed for a visual demonstration of the installation and removal steps.
- Cleaning
- How to Repair Cracks on Your Doll?
When repairing cracks, always use TPE-specific cleaning oil and glue. Follow these steps carefully:
- Clean the Cracked Area
- Apply a small amount of TPE-specific cleaning oil directly onto the crack.
- Gently wipe the surrounding area with a clean cloth or tissue to remove dirt and debris.
- Apply Glue
- Dip a cotton swab in a small amount of TPE-specific glue and carefully fill the crack.
- Gently press the sides together to ensure proper adhesion, avoiding gaps.
- Accelerate Drying
- Use cool air (e.g., a fan) to help the glue dry faster.
- Avoid high heat or hot air, as this may damage the TPE material.
- Surface Finishing
- Once the glue is completely dry, apply a small amount of TPE-specific powder over the crack.
- Spread evenly to restore the natural texture and appearance of the area.
A Funwest demonstration video is provided below, which can help you better understand the repair process and ensure proper results.
{"@context": "https://schema.org", "@type": "VideoObject", "name": "How to Repair Cracks on Your Doll", "description": "How to Repair Cracks on Your Doll", "thumbnailUrl": "https://cdn.dyntube.net/play/use-s/data/s8k0Un5KkCmQ7O4o6s0og/videos/yHM4GSNIlUiU3YJmrI4XrA/v1/images/pubsrv/image_9t2cJ2cEmcYtS8ybBpgA03-md.jpg", "uploadDate": "2025-09-29T09:29:52.7393797+00:00", "duration": "PT1M24.267S", "contentUrl": "https://video.allyourdolls.com/videos/9QWBqKPwnUKQLHd5hDo5QQ", "embedUrl": "https://player.dyntube.com/iframes/qLLKHsTJhES4sUNxXpDXAQ"} - Clean the Cracked Area
 US Local Warehouse
 Europe Local Warehouse
 Elsa Babe Doll
 Evas Doll
 FANREAL Doll
 Funwest Doll
 Gamelady Dolls
 Jarliet Doll
 Orange In Doll
 Ridmii Doll
 Tantaly Dolls
 XNX Doll
 XYDoll
 Male Masturbators-Mini Sex Toy
 Custom Doll Head By Photos
 Buy Replacement Heads(Sold Separately)
 Buy Funwest TPE Heads
 Buy Gamelady Doll Heads
 Buy Kiradols Head Silicone Anime
 Doll Clean | Dry | Disinfection | Repair Accessories
 Doll Storage & Display
 Smart AI & Interactive Upgrades
 Buy Replacement Head (Sold Separately)
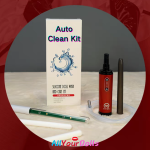 Doll Clean | Dry | Disinfection | Repair Accessories
 Doll Storage & Display